|
Sea
Wolf arrived in the Repair Station completely dead with no signs of
life. The first thing you realize when repairing a Sea Wolf is
that it is a cross between an electro-mechanical game and a video game.
Thus, there are many challenges to overcome in order to get it running
100%. My first
move was to disconnect everything except the power board and fire up
the machine. Upon doing this the game was still dead. The problem
ended up being a cracked fuse holder on the transformer board in the
bottom of the cabinet. Once the fuse holder was replaced I
finally had power running in the cabinet.
|
|
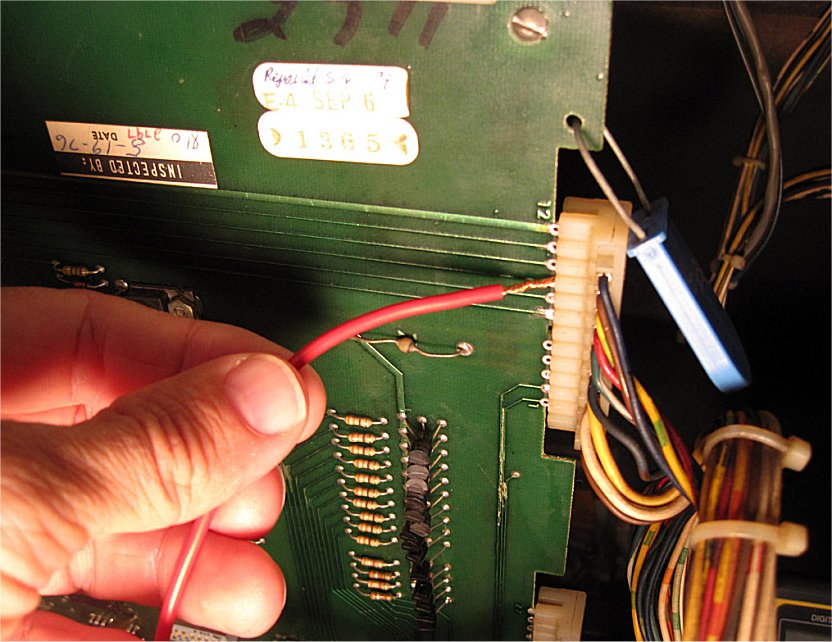
As with most Midway power boards your first
thing you need to do is re-flow any cracked solder on the molex
connector. This board was no exception. With all the solder
reflowed I still had no +5vdc or +12vdc so the power board was
pretty much dead. It turns out the 2N3055 power transistor did
not test shorted in circuit but when removed was definitely bad.
With a new transistor as well as a mica insulator the 12vdc line was
restored. The +5vdc
line was restored by replacing a faulty LM305 voltage regulator.
Once I had these two fixes in place I was able to power up the game
with just the power board connected and everything was humming along.
|
|
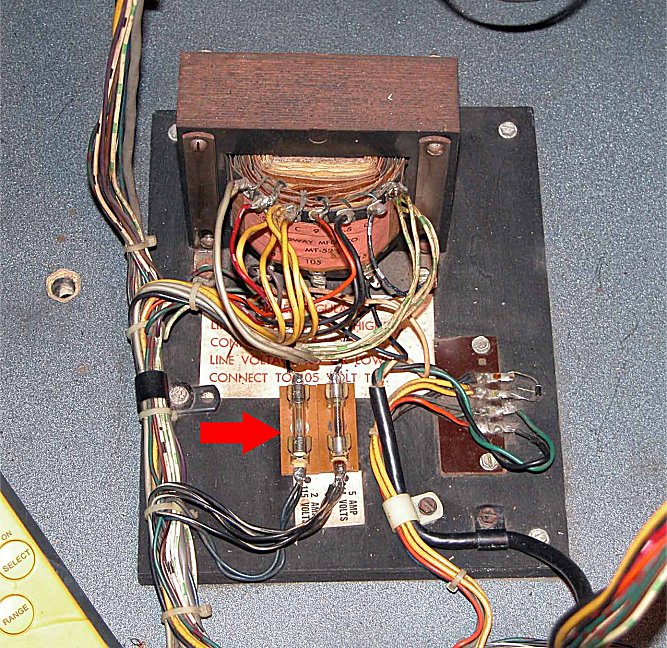
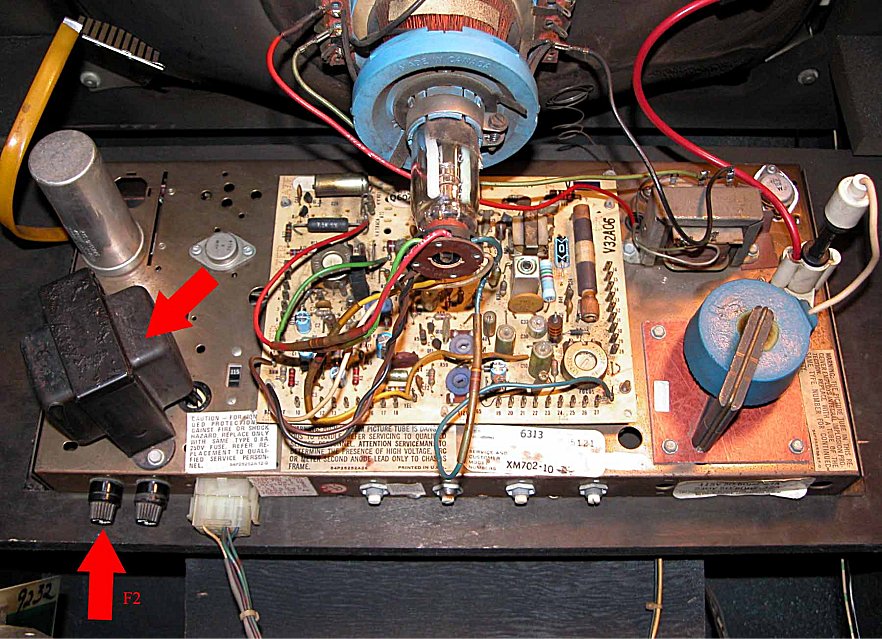
The next problem to tackle was the dead
Motorola XM 702 monitor. As soon as the monitor harness was
plugged in and the game was turned on the fuse in the chassis pan, F2,
blew immediately. I labored over this issue for quite some time
and could not find a single component that was shorting the fuse.
Even after taking off the chassis PCB and triple checking all the
bottle cap transistors the F2 fuse still blew immediately upon power
up. I have never had this problem before but it turns out the
main transformer as shown in the picture was dead shorted causing F2 to
blow. Fortunately I had a working transformer in the parts bin so
swapped out the bad one. Keep this in mind when you are trying to track
down a very hard to find dead short. Before reinstalling the
monitor chassis I installed a cap kit and cleaned it up. At
this
point I had a nice clear screen of full raster.
|

|
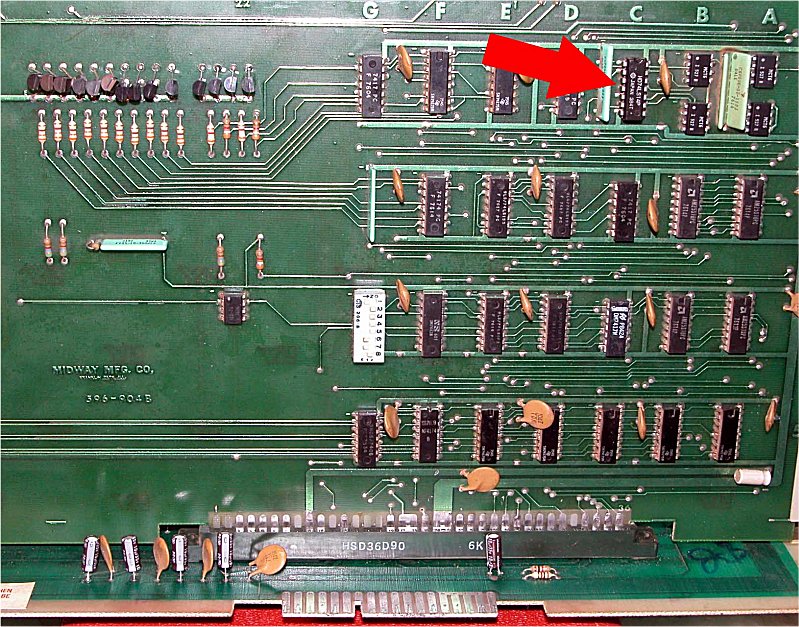
This is where Sea Wolf, even though it is
quite old and pretty straight forward, can be one of the most difficult
games to get 100% working. The game has a 8080 ‘L’ board set (2
boards), a separate sound board and a board that accepts mechanical
inputs from the periscope. You quickly realize there are a
high number of connections all of which have to be perfect for the game
to work properly. I suggest starting with a massive cleaning
and bullet-proofing of all connections before attempting to analyze ANY
game board symptoms. Clean edge connectors with contact cleaner
and a fiber glass pen, adjust or even replace all the Midway edge
connectors and make sure you have good continuity from board to board
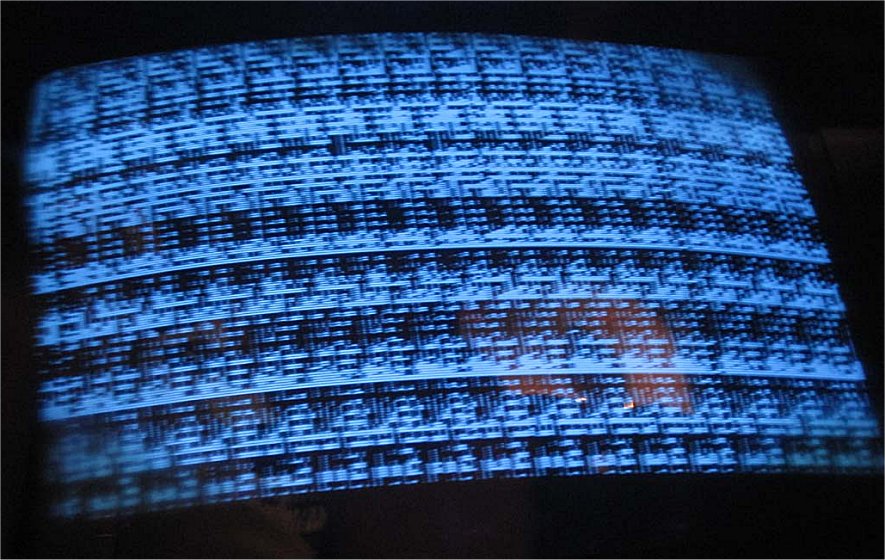
through all the harnesses. After this lengthy process I plugged
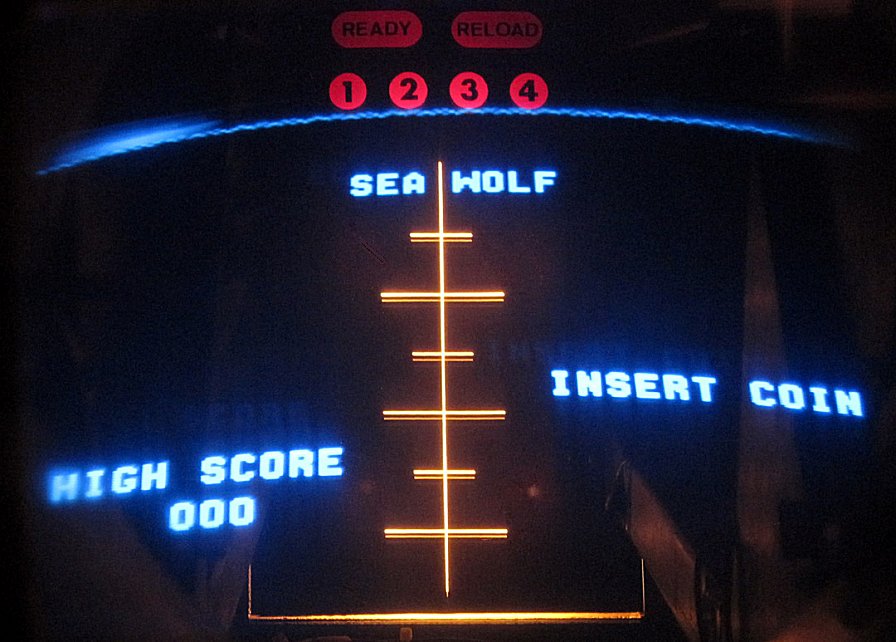
everything in and was met with a non-working game and garbage on the
screen –
Yipeee! (see picture). This screen basically told me several
possibilities - bad RAM or the 8080 CPU was not booting. On
Midway games pulling ROM H, firing up the game should get you a clean
set of alternating thick/thin lines. Unfortunately I was left
with the same garbage on the screen. I replaced the CPU with no
change. I thought
for sure the reset line was shot but I tested it on the linear power
supply and found no problems. Next I dove a little deeper and
measured all of the inputs and outputs on the 8080 CPU with my logic
probe and finally found one single fault. Pin 13 (the HOLD
signal) was reading high instead of low stopping the CPU dead in its
tracks. Working upstream I found two faulty IC’s and verified
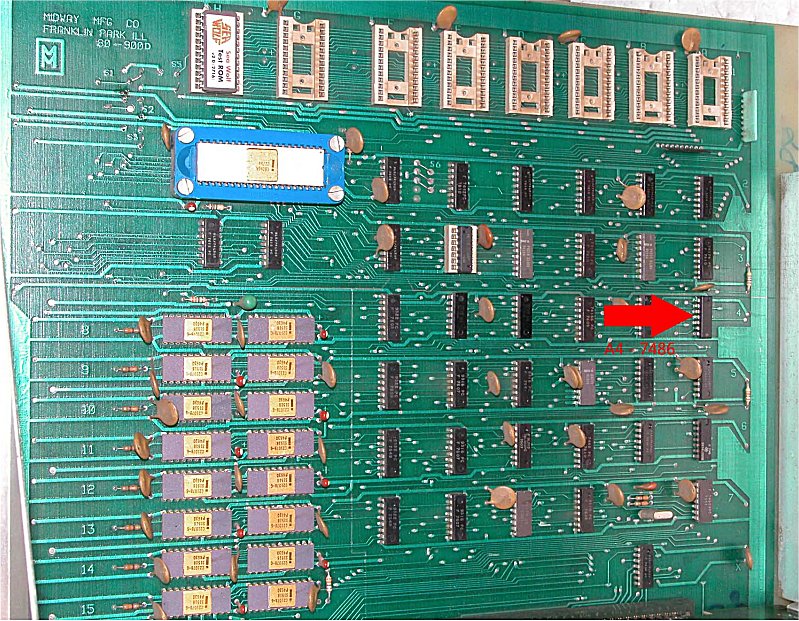
them as bad with my trusty HP 10529A logic comparator. I replaced
a 7486 at A4 on the mother board and a 7414 at C1 on the daughter
board. Once
again I fired up the game to see if I could get pin 13 back to
low.
Pin 13 was now reading low and I was also met with a clean set of
alternating lines on the screen! At this point another quick test
you can use to check the RAM is by closing the slam switch which is
located on the inside of the coin door. Your lines should shift
on the screen and be free of flickering, garbage or anything else which
points to faulty RAM. Mine were clean and shifted just
fine! I meticulously cleaned all the ROM and inspected the
sockets and then fired the game up – amazing – Sea Wolf was working!!!
(or so I thought).
|
 |
Upon trying to play the game I noticed a a series of problems.
There was no sound present, the game fired torpedoes randomly on the
screen
no matter where the periscope was aimed and there were no explosion
lights when you by chance hit a ship. There is a test for the
explosion lights clearly detailed in the manual as well as one in the
cabinet itself. After I replaced several bulbs all the lights worked,
however, none of them
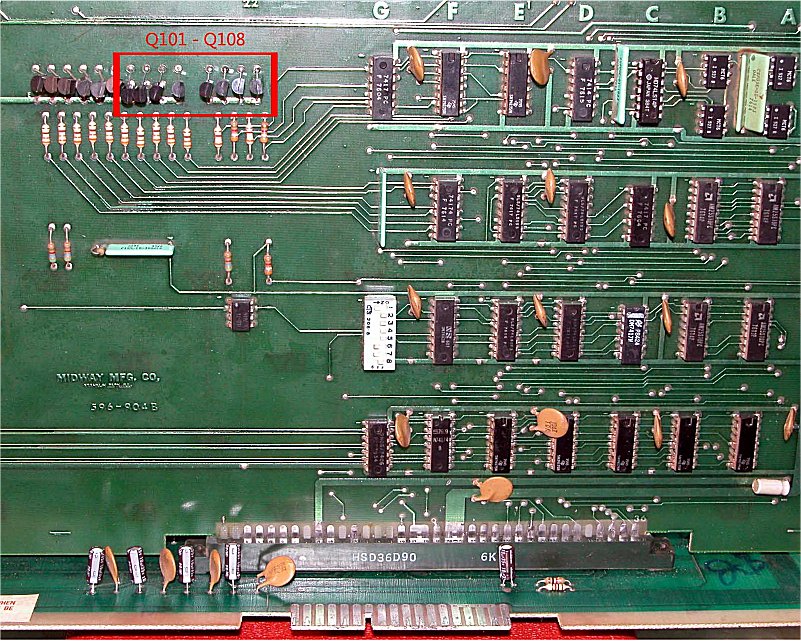
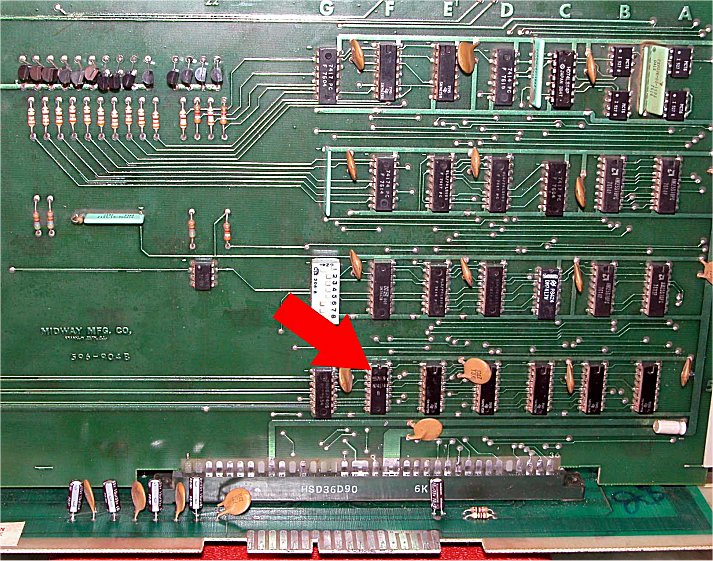
worked during game play. It turns out a common failure is the
transistors located on the daughter board at Q101, Q102, Q103, Q104,
Q105, Q106, Q107 and Q108. These had to be tested out of
circuit and ALL of them were confirmed bad and replaced! (see
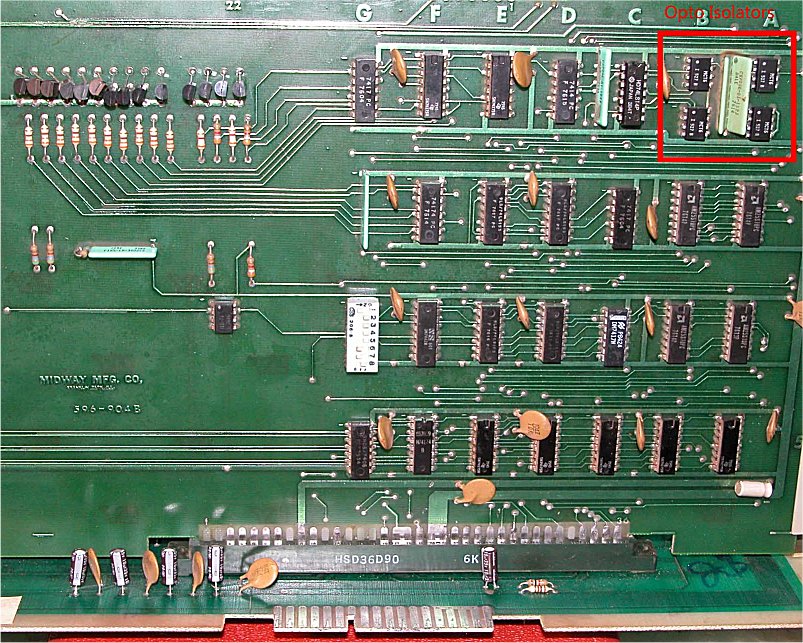
picture). Next was the misfiring torpedoes which pretty much made
game play impossible. Upon cleaning and aligning the contact
board in the upper part of the cabinet things improved
dramatically. Just to be sure they would not be a problem in the
future I replaced the 4 opto-isolators located at A1, A2,
B1 and B2 on the daughter board (see picture).
|
|
|
|
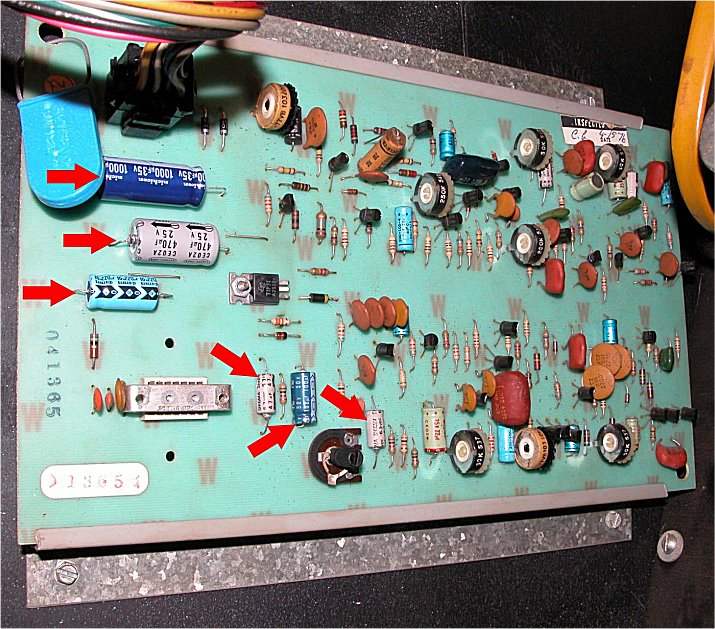
I confirmed power was making it all the way to the
sound
board without issue so my focus was on the sound board itself at this
point. I
decided to re-cap the power and amplifier section figuring it couldn't
hurt
and in the long run would probably lead to cleaner sound (6 caps as
pictured). I also repaired all of the cracked solder on the molex
connection. After the caps were replaced I was going through the
board and
discovered the TIP31 was shorted and the LM354 amplifier was 100%
dead.
Upon replacing the amplifier I was met with BLASTING sound and
immediately had to turn the
master control pot down! Interesting enough there are many
adjustments on
the sound board so don’t think a sound is missing until you have gone
through
them all and ‘tuned them in’. When I was confident I had adjusted
everything the game was still missing the ‘dive’ sound (the sound
associated
with the PT boat) and the ‘ship hit’ explosion sound. There is a
quick
test to help you in your diagnosis which can point you towards the
daughter
board or the sound board in order to find the fault. On the 12
pin
connector on the daughter board you can short pins 7-11 to ground one
at a time
an confirm the sound is present and working. This is
also great
fun when you have not been able to play the game for a month but at
least you
can make some really cool sounds with it! All of my tests
proved the sounds were working just fine (the sound board is good and
the
signal was making it there) and I had a logic problem on the daughter
board
that was killing my dive and ship hit sounds. Working backwards
from the
12 pin connector there are a series of 3 IC’s that can lead to problems
– G5,
F5 and F4. The only way to figure out what is going on is to
check
these chips with a logic probe and when a sound is being called for
make sure
the associated circuit is active. My problem turned out to be F5
not
generating the signal to go from low to high and then feed G5 for the
dive and
ship hit sounds. So upon replacing F5 (74174) I finally had all
of my
sounds back!
|
|
Finally
– Sea Wolf was completely working! Torpedoes AWAY!!!
Tank |


 Sea Wolf Repair Log